How to take a screenshot on a Mac, you can use the following keyboard shortcuts
1. To capture the entire screen: Press Command + Shift + 3. This will capture the entire screen and save the screenshot as a file on your desktop.
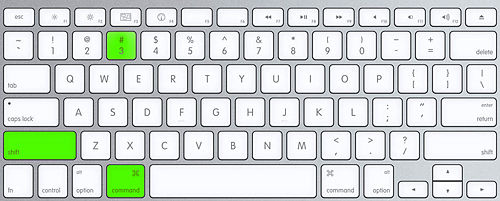
* Press and hold the "Command" key (also known as the "⌘" key) and the "Shift" key at the same time.
* While holding down both keys, press the "3" key.
* You will hear a camera shutter sound and see a small preview of the screenshot in the bottom-right corner of your screen. The screenshot w* To find your screenshot, go to your desktop and look for a new file with a name that starts with "Screen Shot". The file will be in PNG format and will include the date and time that you took the screenshot.ill be automatically saved as a file on your desktop.
* If you don't hear the camera shutter sound or don't see the preview, check your settings to make sure that your Mac is set up to take screenshots.
To capture a window: Press Command + Shift + 4, then press the Spacebar. This will change your cursor to a camera icon, which you can use to click on the window you want to capture. The screenshot will be saved as a file on your desktop.
You can also use the Preview app on your Mac to take screenshots. To do this, open Preview and select File > Take Screenshot. From there, you can choose to capture the entire screen, a portion of the screen, or a window. The screenshot will be saved as a new image in Preview.
2. To capture the entire screen: Press Command + Shift + 3. This will capture the entire screen and save the screenshot as a file on your desktop.
*To capture the entire screen on a Mac using the keyboard shortcut, follow these steps:
*Make sure that the content you want to capture is visible on your screen.
*Press and hold the "Command" key (also known as the "⌘" key) and the "Shift" key at the same time.
*While holding down both keys, press the "3" key.
*You will hear a camera shutter sound and see a small preview of the screenshot in the bottom-right corner of your screen. The screenshot will be automatically saved as a file on your desktop.
*If you don't hear the camera shutter sound or don't see the preview, check your settings to make sure that your Mac is set up to take screenshots.
*To find your screenshot, go to your desktop and look for a new file with a name that starts with "Screen Shot". The file will be in PNG format and will include the date and time that you took the screenshot.
*You can open the screenshot using any image viewer, such as the built-in Preview app or a third-party app of your choice.
Note that if you have multiple displays connected to your Mac, the keyboard shortcut will capture a screenshot of all the displays at once.
3.To capture a portion of the screen: Press Command + Shift + 4. This will change your cursor to a crosshair, which you can use to select the portion of the screen that you want to capture. Once you've selected the area, release the mouse button to capture the screenshot. The screenshot will be saved as a file on your desktop.

*To capture a portion of the screen on a Mac using the keyboard shortcut, follow these steps:
*Make sure that the content you want to capture is visible on your screen.
*Press and hold the "Command" key (also known as the "⌘" key) and the "Shift" key at the same time.
*While holding down both keys, press the "4" key.
*Your cursor will change to a crosshair. Click and drag your mouse to select the portion of the screen that you want to capture. A rectangle will appear around the area that you've selected.
*As you drag, you can hold down the "Shift" key, the "Option" key, or both keys to constrain the selection to a square, a horizontal or vertical line, or to the center of the screen.
*Once you've selected the area that you want to capture, release the mouse button to take the screenshot. You will hear a camera shutter sound and see a small preview of the screenshot in the bottom-right corner of your screen.
*The screenshot will be automatically saved as a file on your desktop. If you want to cancel the screenshot, press the "Escape" key before releasing the mouse button.
*To find your screenshot, go to your desktop and look for a new file with a name that starts with "Screen Shot". The file will be in PNG format and will include the date and time that you took the screenshot.
You can open the screenshot using any image viewer, such as the built-in Preview app or a third-party app of your choice.
Note that if the window you want to capture is partially hidden or covered by other windows, you may need to rearrange your windows or use the "Option" key in addition to the "Space" bar to make sure that the window is visible and selectable. Additionally, if you want to capture a specific part of a window (such as a dialog box or a menu), you can use the crosshair cursor to select the area within the window that you want to capture after you switch to window selection mode,
you can also use the Preview app on your Mac to take screenshots. To do this, open Preview and select File > Take Screenshot. From there, you can choose to capture the entire screen, a portion of the screen, or a window. The screenshot will be saved as a new image in Preview.
Comments
Post a Comment